
Sample Sidecar Installation
Following here is a copy of the guide for installing a Texas Sidecar on the Kawasaki Vulcan Nomad. This is reproduced here as an example of the type installation guide we send with Texas Sidecars. Some installations are less complex than this one and some installations are more complex. This example may vary from the one we actually send as mounting parts and procedures are subject to change.
1) Uncrating and Unpacking
Unpack sidecar and inspect for any shipping damage
The sidecar is secured to a solid plywood platform which has 2×4 skids built in. The crate outer shell is also solid plywood with 2×4 inner braces. If there appears to be damage to the crate, notify the shipper when you pick it up. It might be worth taking the dozen or so screws out of the top and visually inspecting the contents
Inventory
Inside the body of the sidecar you should find the following items:
- Tonneau cover
- Windshield
- Bag with windshield mounting bolts, nuts, washers and caps
- Mounting arm pinch bolts
- Four bags containing mounts for motorcycle frame
- Two lower mounting arms bosses with heim joints
- Two lower mounting arm clamps
- Strut mounts for sidecar chassis
- Strut mounting bolts and bolted down against the side is the wheel
Unbolt sidecar frame from pallet
Donate shipping crate to someone with a dog or needing a hunting blind.
Unbolt the body from the chassis
Remove the four bolts that run through the carpet, body and chassis and set the body aside. Installing the sidecar chassis without the body installed makes the job considerably easier. Save the bolts, nuts, and washers for remounting the body. When reinstalling these bolts, put the big washers on top of the carpet.
2) Installing the Frame Mount
There are four mounts that must be installed on the motorcycle frame: two upper mounts for attaching the sidecar struts and two lower mounts for attaching the sidecar mounting arms.
Front Upper Mount:
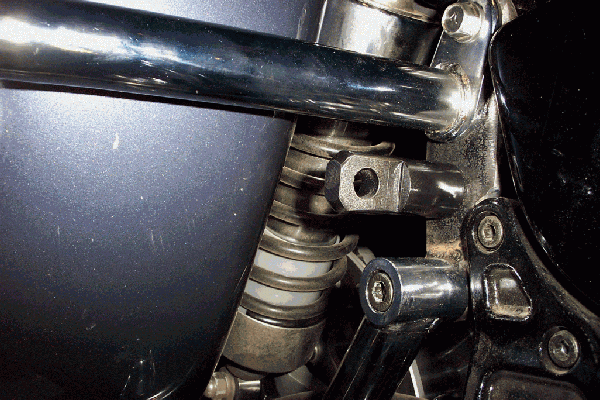
1. Locate the right upper frame split joint just in front of the exhaust pipe. Remove the allen head cap bolts from this joint. (Save these bolts for use on the lower rear mount.) See picture below.
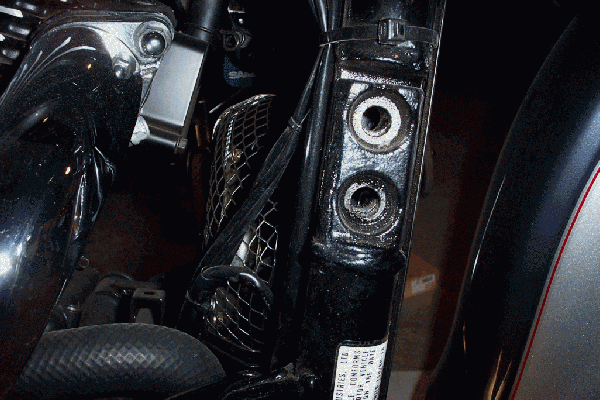
2. Install the mount labeled “Upper Front” using the bolts and lock nuts supplied with the mount. Tighten the mounting bolts and nuts. Do not tighten the rod end yet. See picture below.
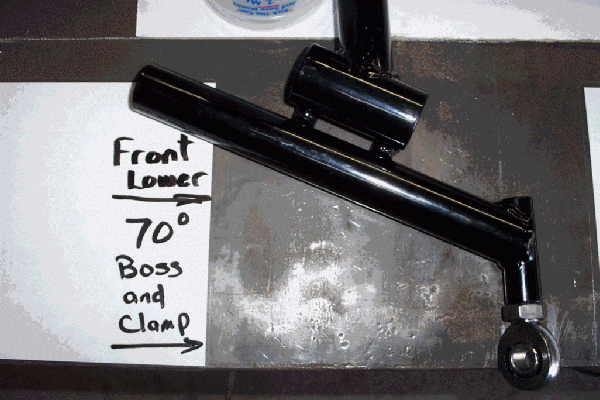
Front Lower Mount
Disassemble the mount labeled “Lower Front” and slide the U-
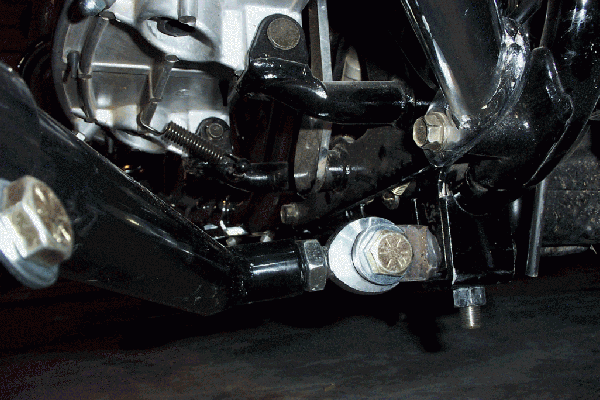
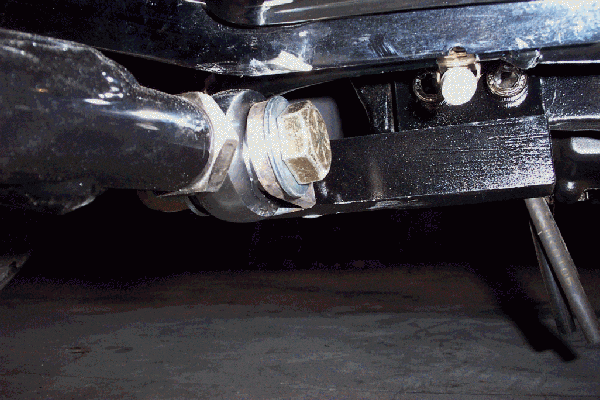
Lower Rear Mount
1. Locate the right side frame rail splice on the motorcycle. Remove the two allen head cap bolts.
2. Using the longer allen head bolts taken out of the upper front frame splice, install the mount labeled “lower rear mount.”
3. Tighten the lock nut on the rear of the U-
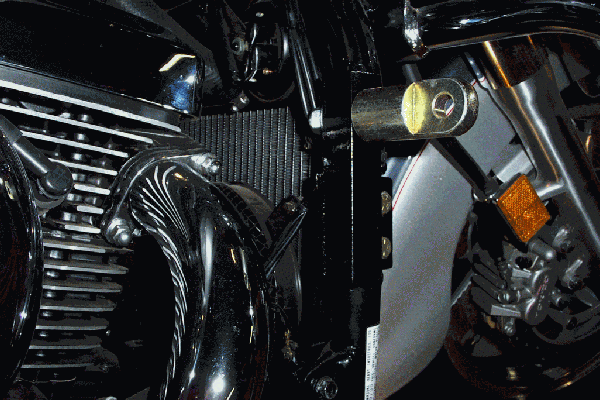
Upper Rear Mount
1. Remove the bolts holding the rear “crash” bars to the bike frame.
2. Slide the plate labeled “Upper Rear Mount” between the frame and the bars.
3. Inside the bag with the mount is a shim – insert it between the mounting plate and the lower bar end. See picture below.
Once all the mounts are on the bike, continue with the sidecar mounting instructions.
3) Installing the Sidecar
Preparing the chassis
A. Install front lower mounting arms
Insert the 70 degree boss (the arm with the heim joint) into the clamp (the arm with the pinch bolts having the same angle).
Slide the assembly into the front frame mounting tube. This is more easily done if you use a small chisel tapped into the space between the pinch bolt mounts, spreading the frame mount slightly.
Keep the assembly approximately horizontal and pointing reward. Remove the chisel if you used it to spread the pinch bolts and install the 4 pinch bolts and lock nuts. The pinch bolts should be snug.
The mounting arm will be pointed toward the rear of the sidecar similar to the pictures below. The mounting arm MUST stick out past the end of the clamping arm.
B. Install rear mounting arms
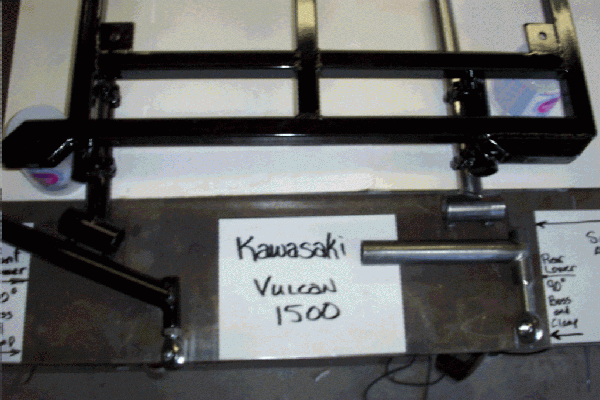
Insert the 90 degree boss (the arm with the heim joint) into the clamp (once again, this arm should also be a 90 degree).
Slide the assembly into the rear frame mounting tube. This is more easily done if you use a small chisel tapped into the space between the pinch bolt holes, spreading the frame mount slightly.
Keep the assembly approximately horizontal and pointing forward. Remove the chisel if you used it to spread the pinch bolts and install the pinch pinch bolts and lock nuts. The pinch bolts should be snug.
The mounting arm will be pointed toward the front of the sidecar similar to the picture below.

Mounting wheel
Install wheel – snug lug bolts up tight
4) Connecting the chassis to the bike
It will be much easier to do the initial installation (and to remove the sidecar in the future) if it is sitting on a dolly of some kind. There are several companies that sell carpeted furniture dollies for $20-
Put chassis on furniture dolly. Block the frame up until the tire just touches the ground and the frame is level (this should be approximately 9 inches from the ground to the bottom of the chassis). Use a 12 to 24 inch long level to check the frame side-
With the bike level, carefully wheel the chassis into position and prepare to attach the lower sidecar mounts to the motorcycle. Initially, the bike does not have to be perfectly upright and the attachment is sometimes more easily done with someone sitting on the bike and keeping the bike as close to level as possible.
Position the chassis where the sidecar axle is sitting approximately 8-
Try to position the chassis a comfortable distance away from the foot pegs or floorboards, but as close as possible to the bike.
Beginning with the lower front, loosen the pinch bolts only enough to tap the mounting arms gently until the heim joint can slide into the female clevis. You may need to rotate the heim joint some and/or the clevis a small amount, but in general, the bolt should slide straight through the clevis and the heim joint. Check to see that bike and sidecar chassis are still level – try to keep the chassis level throughout the assembly. Snug pinch bolts.
The sidecar will be able to move in and out now, pivoting on the front mount. Loosen the pinch bolts, if necessary, and align mounting arms until rear heim joint fits into mount. Slide bolt in from back to front. Check level of bike and sidecar chassis. Adjust if necessary and tighten pinch bolts.
Given that the chassis is level side-
You will want to set the toe in at 1/4 to 1/2 inch. Using straight lines drawn on the floor of your shop, have the distance between the two lines drawn through the bike wheels and the sidecar wheel is narrower at the front than the rear.